


How to Enable User-Defined Fields in Acumatica: A Step-by-Step Guide



Key insights

It’s easy to enable user-defined fields in Acumatica. Explore this step-by-step guide to find out how.

Just one attribute in the ASPX editor unlocks UDFs on screens that don’t support them out of the box.

Build the package in production, publish it to every environment, and test the new UDF option to keep instances in sync.


How do you enable UDFs on an Acumatica screen?
To enable user-defined fields (UDFs) on an Acumatica screen that doesn’t support them out of the box, create a customization package, add the screen using “Customize Existing Screen,” open the ASPX editor, and set EnableAttributes=”True” in the PXDataSource. Then generate the customization script and publish the package. After publishing, the screen displays UDF options just like screens with native support.
Why user-defined fields matter in Acumatica
User-defined fields let your team capture business-specific data without heavy development work. Finance teams use them to track internal codes, HR teams use them to record employee attributes, and operations teams use them to tag records for reporting.
The challenge is not every Acumatica screen includes UDF functionality by default. When a screen lacks it, the UDF option doesn’t appear under the customization menu.
The good news: you can turn UDFs on with a small, low-risk customization package. This guide uses the Employee master screen as the example, but the same approach applies to other screens missing UDF support.
Before and after: What changes
Before the package is published, there is no UDF feature available under the customization menu for the screen.

After the package is published, the screen is enabled with UDF functionality and users can add their own fields.

Step-by-step: Enable UDFs with a customization package
Step 1: Create a customization package
Open the Customization Projects area and create a new package. Make sure the package name doesn’t contain spaces, since Acumatica won’t accept them.

Step 2: Add the screen with “Customize Existing Screen”
Inside the package, choose “Customize Existing Screen” to add the screen you want to update.
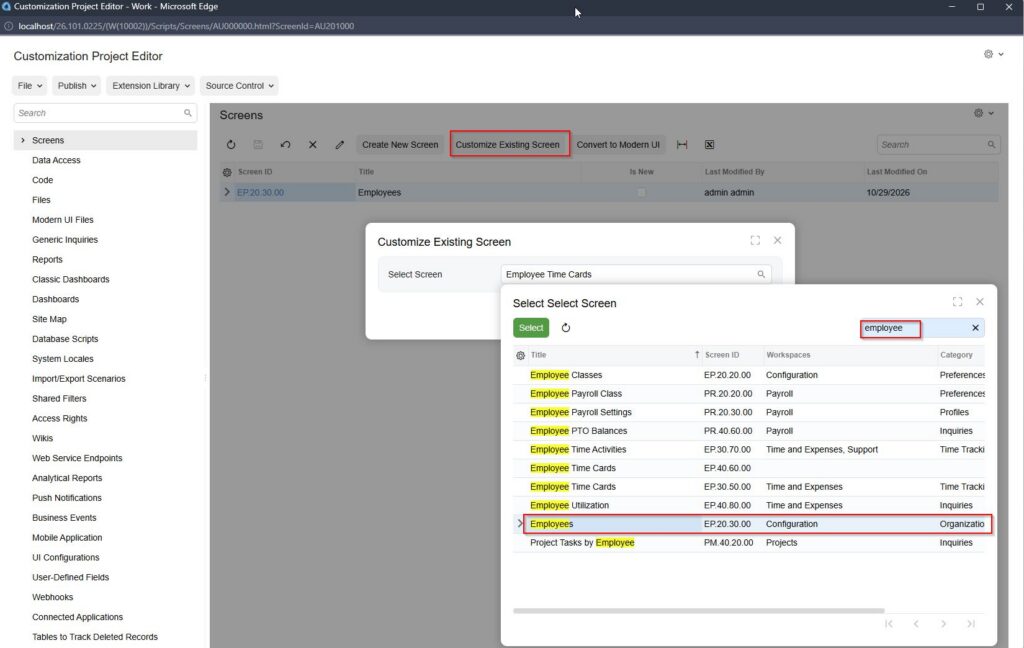
Step 3: Select the Employee screen
Search for and select the Employee screen (or whichever screen you are enabling), then confirm your selection.

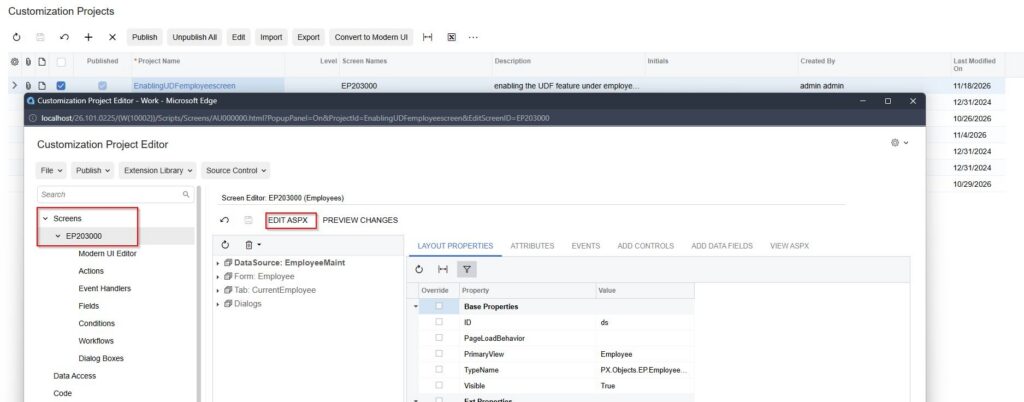
Step 4: Open the ASPX Editor
Expand the left pane to view the screen or screens you added. Select the screen and choose Edit ASPX.
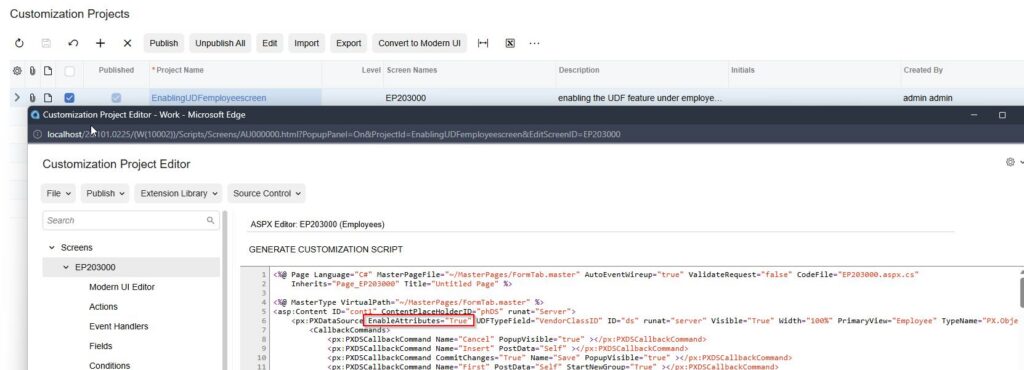
Step 5: Add EnableAttributes=”True” to the PXDataSource
In the ASPX editor, locate the PXDataSource element and add EnableAttributes=”True”. This single attribute is what unlocks UDF functionality on the screen.
Step 6: Generate the script and publish
Click “Generate Customization Script,” then publish the package. Once published, the screen is enabled with UDFs.

Recommended practices for deploying the package
- Create the package in the production environment, then publish it through all environments so your instances stay in sync.
- Use clear, space-free package names identifying the screen and purpose.
- Test the new UDF option on the screen after publishing to confirm it appears under the customization menu.
- Document which screens you have enabled so future upgrades and audits are easier.
Frequently asked questions about UDFs in Acumatica
Can I enable UDFs on any Acumatica screen?
This method is designed for screens lacking built-in UDF functionality. Adding EnableAttributes=”True” to the PXDataSource through a customization package is what turns the feature on.
Do I need to write code?
Only one attribute is added in the ASPX editor. The rest of the process uses standard Acumatica customization tools.
Where should I build the package?
Create it in production and publish it through all environments.
How CLA can help with UDFs in Acumatica
Whether you need to enable UDFs on a few screens or want broader improvement of your Acumatica environment, CLA’s digital team can help you configure the platform to match how your business works. Contact CLA to talk with an Acumatica consultant.
 Tags
Contact us
Get help customizing Acumatica to fit how your business works. Complete the form below to connect with CLA.
Connect

Wimalendran Rajendran
Consultant


Experience the CLA Promise
Sign up to receive custom information and insights delivered straight to your inbox.